Carpal Tunnel Syndrome – Causes and Treatment
- Disease - causes, symptoms and remedies
 Dipak Singh
- 0
- 11 minutes read

Carpal Tunnel Syndrome: Before we discuss the causes and treatment of Carpal tunnel syndrome, let’s understand what is carpal tunnel syndrome.
What is carpal tunnel syndrome?
Carpal tunnel syndrome is a prevalent condition that afflicts millions of people in the U.S. alone and is significantly more common in women than in men. When the median nerve, located in the wrist, becomes compressed or swells, it can produce constant or chronic pain and numbness, which are the symptoms of carpal tunnel syndrome. The median nerve controls movement and our ability to perceive sensation in our hands.
Causes and Treatment of Carpal Tunnel Syndrome?
Carpal tunnel syndrome is often the result of repeatedly performing a task over a long duration, often years. The repetitive nature of such activities as typing, knitting, playing a musical instrument, etc. can aggravate the ligaments and tendons in which the median nerve is located, causing it to distend or be compressed.
Other factors can also engender the onset or aggravate existing symptoms of carpal tunnel syndrome, such as menopause, or certain conditions like diabetes and rheumatoid arthritis.
Dietary and Lifestyle Steps to Combat Carpal Tunnel
- Cut out excess salt consumption –- it can further inflame already existing symptoms by contributing to water retention.
- Take breaks often when performing repetitive tasks with your hands to stretch and flex them.
- Placing an ice bag on the aggravated areas can help alleviate the pain.
- Avoid alcohol as it dehydrates tissue cells.
Nutritional Supplement Protocol to Combat Carpal Tunnel Syndrome
Although there are several interventionist options for carpal tunnel syndrome, such as surgery and cortisone injections, various studies have shown that a deficiency in vitamin B6 is often associated with the condition. Vitamin B6 is a crucial nutrient needed for healthy nerve tissues and harbours anti-inflammatory properties that may help counter swelling.
Indeed, according to the “Encyclopedia of Nutritional Supplements” by Michael Murray, N.D. “In a double-blind placebo-controlled study, the University of Texas successfully treated hundreds of patients suffering from carpal tunnel syndrome with Vitamin B6. It may take as long as 3 months to produce a benefit, but vitamin B6 is effective in many cases.”
Also Read: Some Facts About Osteoporosis
World famous Reader’s Digest, moreover, in their extensive tome “The Healing Power of Vitamins, Minerals, and Herbs” point out that the enzyme Bromelain could be highly beneficial for carpal tunnel syndrome, due to its potent anti-inflammatory effects, along with Tumeric. This herb belongs to the ginger family. They believe both substances if taken together, will enhance each other’s efficacy.
In addition, we believe one should also include vitamins E and C, both powerful antioxidants, and the entire B-vitamin complex, due to their synergistic nature.
Exercises For Carpal Tunnel
You should only exercise under your doctor’s supervision to make sure it is both safe and beneficial for you. The exercises that will help you achieve your rehabilitation objectives should be discussed with your physician or physical therapist.
Your doctor might suggest a therapeutic exercise programme as a treatment choice. The pressure on the median nerve at the wrist may be lowered by exercise. To ease symptoms, they may be combined with bracing, splinting, medication, and activity modifications.
Specific activities that promote the median nerve’s greater mobility within the carpal tunnel may be beneficial for some patients. Additionally, performing activities to help tendons pass through the carpal tunnel can aid increase joint mobility and hand function.
Contact your doctor or physical therapist if you are unsure about how to perform an activity or how frequently to do it.
3 Stretching exercises for carpal tunnel syndrome
- Wrist Extension Stretch
- Wrist Flexion Stretch
- Median Nerve Glides
We will learn about how to perform these exercises and what precautions we should take while exercising for carpal tunnel syndrome. The best thing is you need not any equipment to perform these carpal tunnel exercises.
1. Wrist Extension Stretch
Guideline: The day should be spent stretching, especially before engaging in physical activities. This stretch ought to be incorporated into the warm-up to grip-intensive activities following recovery.
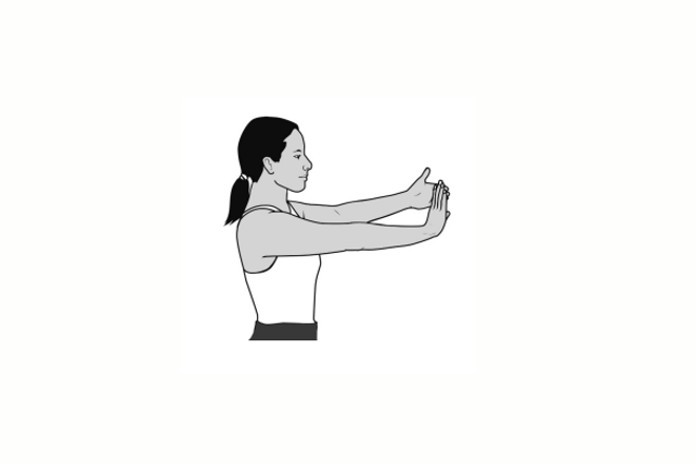
Detailed instructions
- Bend your wrist back and straighten your arm as though you were telling someone to “stop.”
- When you feel a stretch on the inside of your forearm, gently pull the palm of your opposite hand toward you while applying light pressure across the palm.
- Tension the muscle for 15 seconds.
- After five repetitions, switch to the other arm and repeat this stretch.
- Do this 4 times a day
- Precaution: Don’t lock your elbow
2. Wrist Flexion Stretching
Guidelines: The day should be spent stretching, especially before engaging in physical activities. This stretch ought to be incorporated into the warm-up to grip-intensive activities following recovery. Please be aware that this stretch may cause your fingers to briefly become more numb. If the numbness becomes unpleasant, stop stretching.
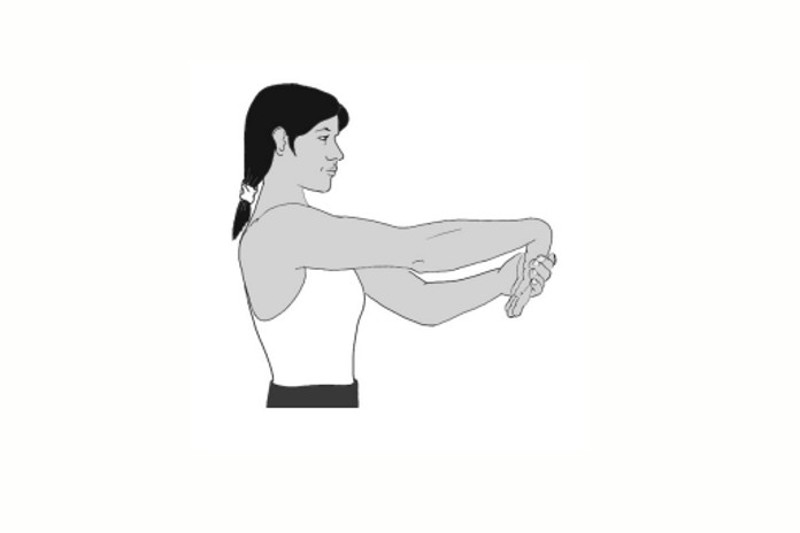
Detailed instructions
- Bend your wrist so that your fingers are pointing downward and straighten your arm with your palm facing down.
- To feel a stretch on the outside of your forearm, slowly move your hand toward your body.
- For 15 seconds, keep the stretch in place.
- Repeat this stretch five times, then move on to the opposite arm.
- Precaution: Don’t lock your elbow
- Perform this 4 times a day
3. Median Nerve Glides
Guidelines: 15 minutes should pass while your hand is being gently warmed up before beginning these workouts. Apply a bag of ice or frozen peas to your hand for 20 minutes after finishing the exercises to reduce swelling. Hold each of the ensuing positions for 3 to 7 seconds.
Detailed instructions
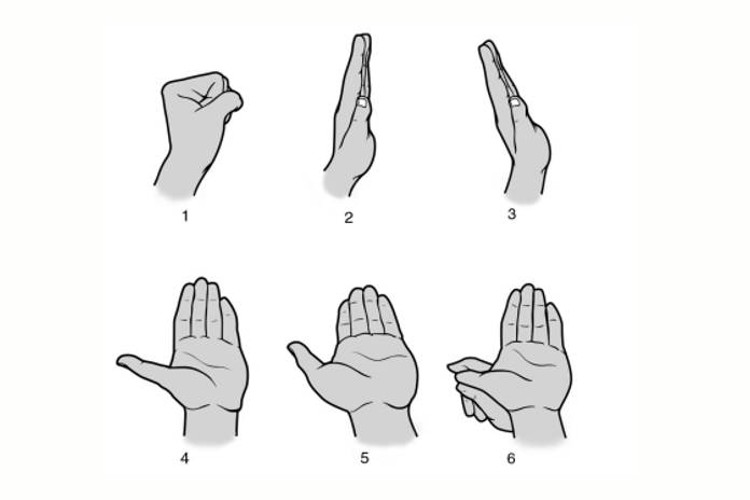
- Make a fist with your thumb outside your fingers (1st image)
- Extend your fingers while keeping your thumb close to the side of your hand (2nd image)
- Maintain your finger position while extending your wrist (bend your hand backwards toward your forearm); (3rd image)
- Maintain your finger position while extending your thumb; (4th image)
- Turn your forearm palm up; (5th image) and
- Maintain your finger position while extending your wrist and thumb while gently stretching the thumb with your other hand (6th image)
- Repeat this 5 times, then move on to the opposite arm.
- Do this activity 10-15 times a day
- Precaution: In position 6, do not apply excessive pressure to your thumb.
4. Tendon Glides Stretches
Guidelines: 15 minutes should pass while your hand is being gently warmed up before beginning these workouts. Apply a bag of ice or frozen peas to your hand for 20 minutes after finishing the exercises to reduce swelling.
Here are two sets of tendon gliding exercises. For both series, adhere to the following broad guidelines:
- Move in order from position 1 through position 3
- Hold every position for three seconds.
- Increase the number of repetitions or the frequency with which you perform the exercises as they become simpler to accomplish.
Detail Instructions for Series A
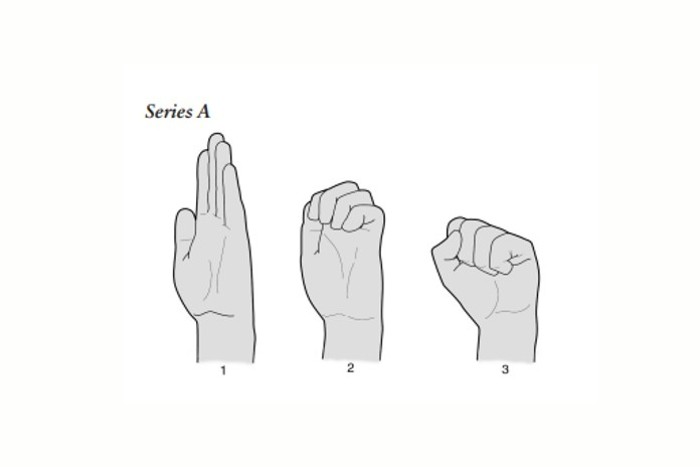
- Straighten your wrist and extend your hand in front of you, allowing all of your fingers to be fully extended. – First step
- Your knuckles should be pointing up, and the tips of your fingers should be bent into the “hook” position. – Second step
- Put your thumb over your fingers and clench your fist firmly. – Third step
Detailed Instructions for Series B
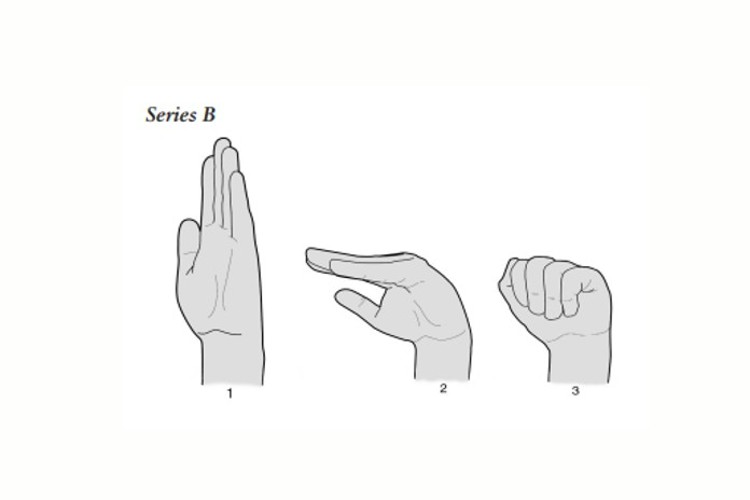
- Fully straighten all of your fingers while maintaining your wrist and hand in front of you straight – The first step
- Bend your fingers at the bottom knuckle while keeping them straight – Second step
- Bend them at the middle joint so that they contact your palm – third step
Read Also: Osteoporosis- Symptoms and Treatment